Overview
In today's fast-paced business environment, focusing on employee growth and performance is more important than ever. Organisations rely on structured review cycles to track progress, align goals, and encourage effective teamwork. This article will walk you through how to set up your first review cycle using Keka's platform.
Getting Started
-
To begin, go to the Performance section in Keka and click the Reviews tab. Then, select the Review Cycle tab and click +Create Review Cycle to start a new review cycle.
You’ll have two options to choose from:
Quick Setup: Ideal for small to medium-sized businesses looking for a quick and easy setup.
Advanced Setup: Best suited for larger organisations with multiple review cycles and a need for deeper customisation.
-
If you need more flexibility and customisation, select Advanced Setup and click on Verify Setup.
Creating a Review Cycle
In the Advanced Setup option, you’ll begin by naming the review cycle and providing a brief description. From there, you can choose how reviews will occur in your organisation:
Same time for all: All employees undergo reviews at the same time.
Based on DOJ: Reviews happen based on the employee's Date of Joining.
Create your own: Customise the review timing as per your organisation's needs.
-
This decision will also influence how employees are mapped to various groups later on.
Adding Reviewers
-
Now, it’s time to choose who will provide feedback on employee performance. By default, Self and Reporting Manager are selected as reviewers, but you can add more roles or specific individuals by clicking on +Add More Reviewers.
-
Select additional reviewers and click Save.
-
You can customise who nominates reviewers, the minimum and maximum number of reviewers, and enable notifications for approvals whenever a self or reporting manager nominates a reviewer.
Creating Review Forms
In this step, you’ll define the Rating Scale you want to use.
Navigate to the Review Form section. Click on Rating Scale to view the current scale.
-
To make changes, click Manage Scales in the top-right corner.
-
To select different scales :
Check the box next to the preferred scale.
-
Click Save to apply it to your review form.
To create a new scale:
-
In the Manage Scales window, click + Add New Scale.
-
You can choose a Star-based rating or create a Custom rating.
Star-based (default): Uses visual star icons.
Custom Rating: Define your own labels and values.
-
You can also enable Decimal rating scale to configure decimal usage:
Enable: Allows ratings like 4.5 for more precision.
Disable: Restricts ratings to whole numbers (e.g., 4, 5).
Set a name for the scale.
Define the score values, labels, and optional descriptions.
-
Click Save. If there are issues (e.g., duplicate name), the system will prompt you to fix them.
-
Once the rating type is decided, configure the review form by selecting which reviewers are required to fill out the form in the Question section. You can add custom questions or choose from pre-existing templates.
You can enable reviewers to evaluate an employee's performance in key areas of the organisation, such as Questions, Goals, Core Values, Projects, Competencies & Skills. Moreover, you can configure the order in which these review aspects will appear on the reviewer's form.
- For the Competencies part, you get to choose who will assess them and what types of feedback they can offer. You can also select specific competencies for each reviewer to concentrate on.
-
The Core Values & Projects section works much the same way. You select the reviewers and define what types of responses they can provide, tailoring the review to align with what your organisation values.
-
For Skills you choose the reviewers and define the response types and also you can choose which category each reviewer should focus on.
In terms of Goals, you can pick the time frame you want these to be assessed for. You can also decide who will review these and the kinds of answers they can submit. You also have the choice to allow sub-goal reviews, although this is typically not recommended.
For more details on adding questions, refer to our article on Adding Questions.
Review Goals Progress Override
-
You can automatically populate ratings based on goal progress. Keka will calculate the ratings for you, but you can allow specific reviewers to override these auto-calculated ratings if needed.
Calculating Pre-filled Ratings
Keka calculates pre-filled ratings based on the following method:
Objective/Goal/KRA Rating: The highest rating on the selected scale is multiplied by the goal's progress percentage, then divided by 100.
Decimal Ratings: If enabled, ratings are rounded to the nearest 0.5 value (e.g., 1.5 or 2).
-
For Key-Result/Sub-Goal/KPI Rating, ratings are pre-filled based on the progress of individual Key-Results/Sub-Goals/KPIs. The overall goal rating is calculated based on the aggregate of all these ratings.
Potential Rating
-
To assess employee potential alongside performance, you can enable Potential Ratings for each section of the review, including Questions, Goals, Competencies, Core Values, Projects, and Skills.
-
To enable potential ratings, simply toggle the Allow reviewers to provide potential ratings option in the settings and click on Save.
-
Next select Potential in the ratings dropdown for each review section.
Additional Settings
-
When you access Additional Settings, you will find options to allocate different weights for each reviewer and for each parameter if you have enabled ratings.
-
You can also provide a personal message to guide the reviewers through the review process.
- If you want the reviewers to be able to suggest a rating different from the auto-calculated one, you can turn on the Proposed Rating feature. This feature enables a reviewer to offer a different overall rating for the employee. After that, you can choose who has the authority to finalise this proposed rating.
- Lastly, you can set additional rules for reviewers under Additional Options. These rules include requiring comments, allowing attachments, or permitting them to skip ratings.
-
You will also see an option to show overall rating labels and descriptions, ensuring a comprehensive understanding of performance feedback.
- Upon enabling the Overall Rating Label setting, a new visibility option is made available for the review forms, To access this, navigate to Visibility Settings of the review section. In this section, you will need to select "Set Custom Visibility" and enable the option for self-viewing, allowing you to access the review forms of other reviewers in the After filling stage. Additionally, you can choose a specific reviewer from the dropdown menu. You can also modify the settings for all other reviewers both during and after the completion of the form.
- While filling the form the review labels will appear as shown below.
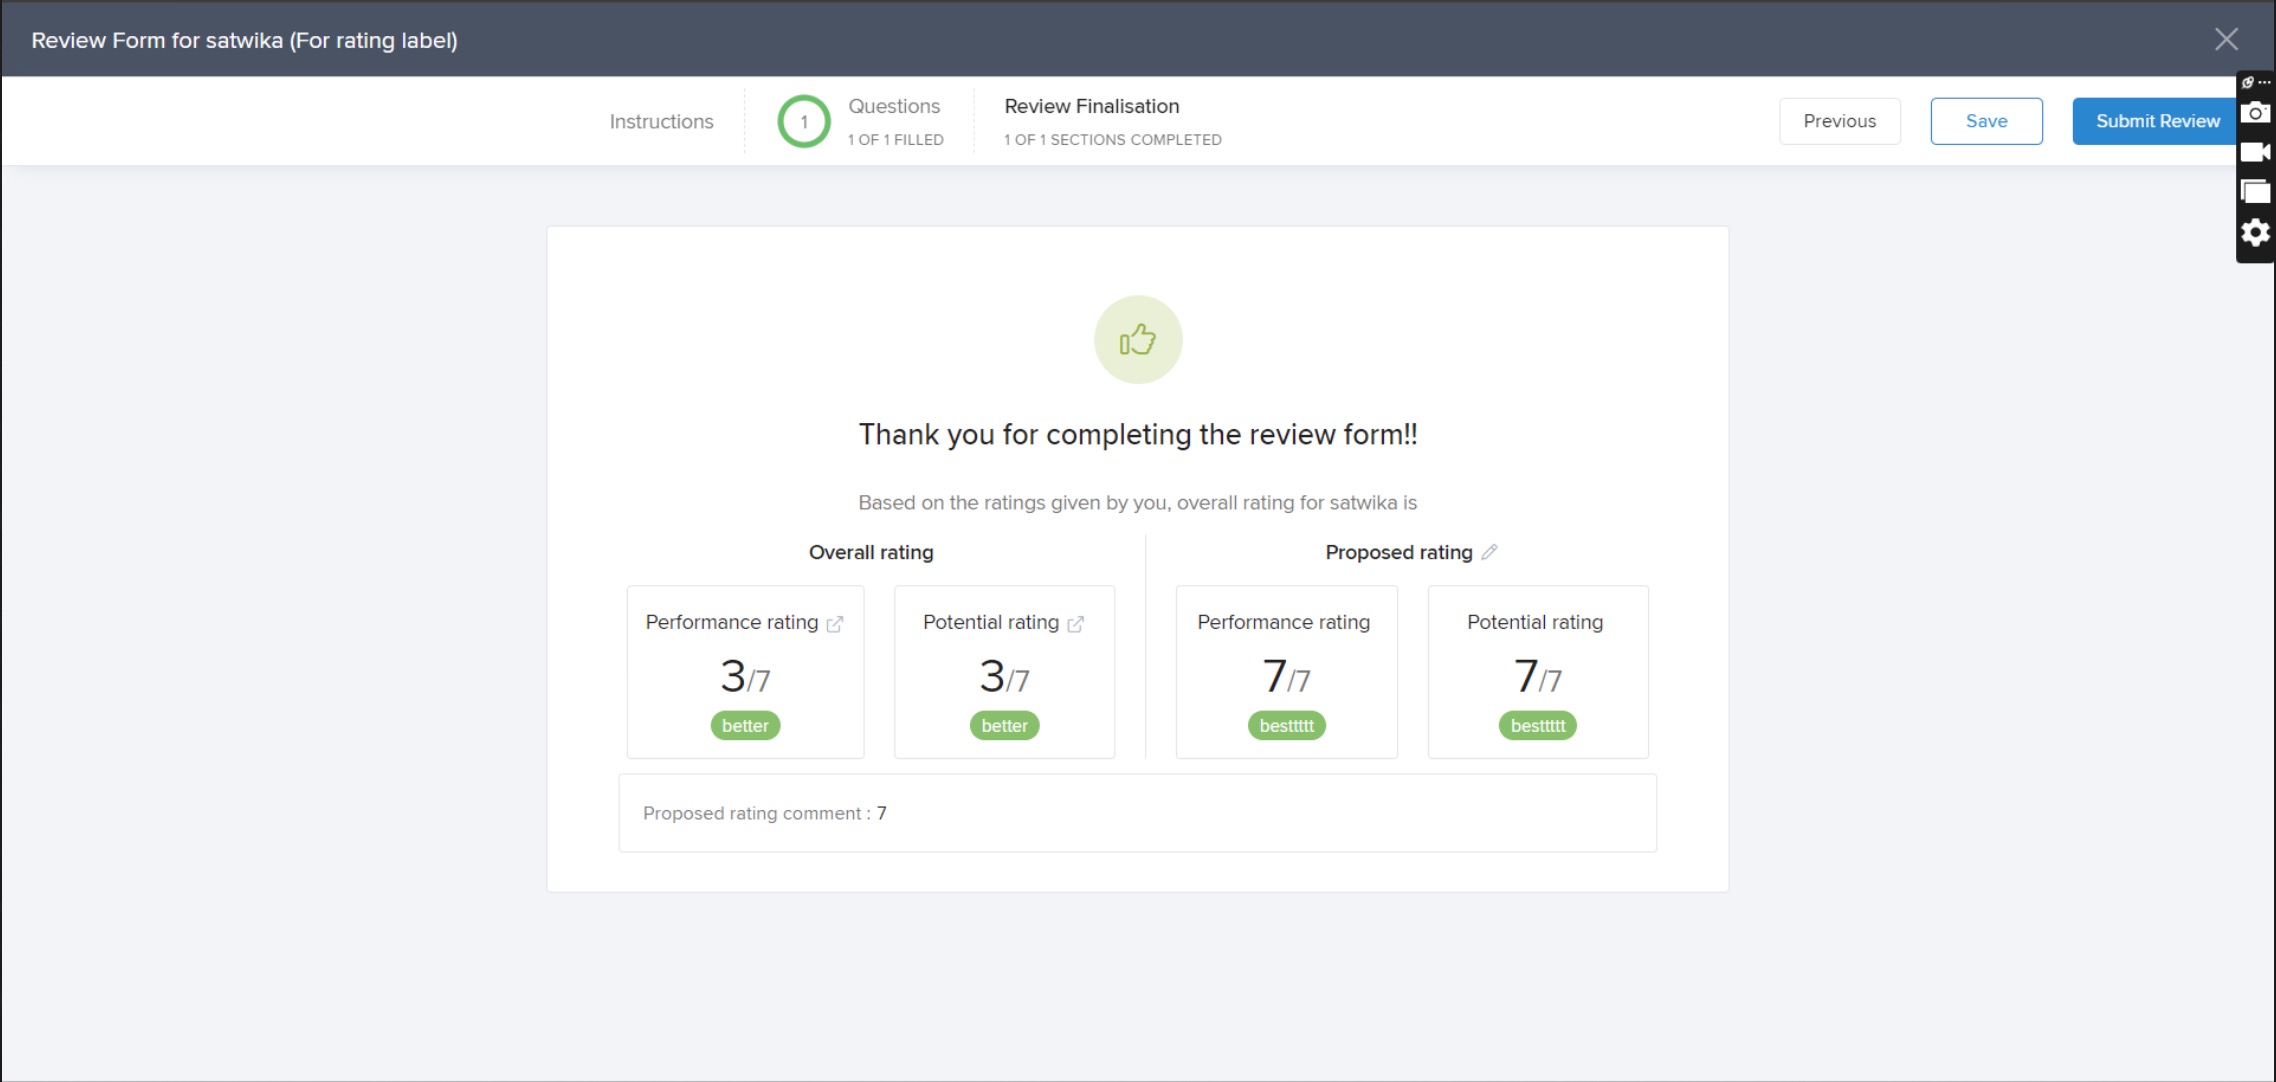
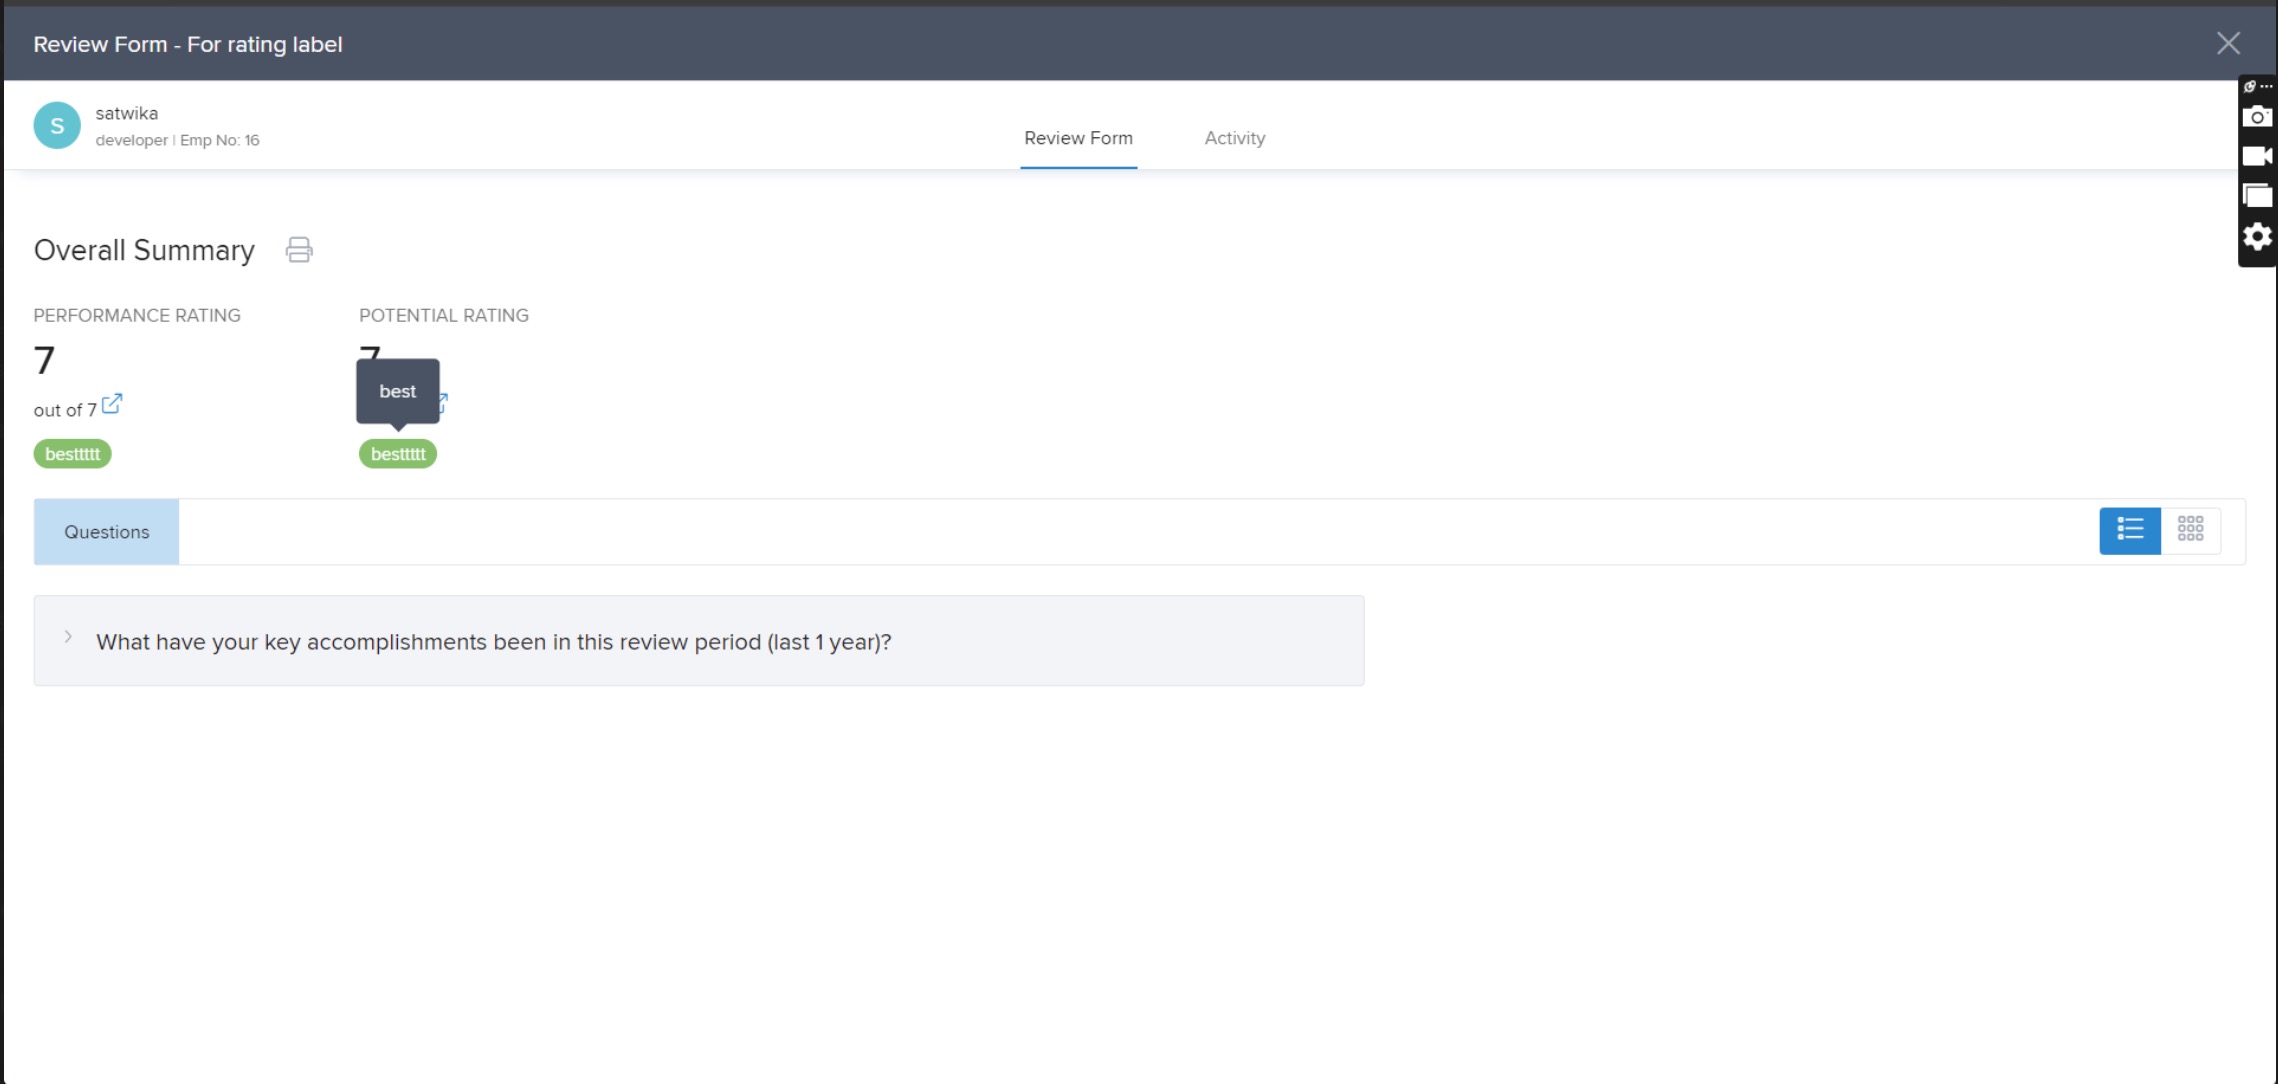
- After the review is released the labels will show as shown in the below screenshot, also by hovering over a rating label, users can view a detailed description which was entered while setting up the review label.
Setting Up Post-Review Meetings
Once the review forms are submitted, you can set up one-on-one meetings between managers and employees. These meetings are a great opportunity to discuss performance, achievements, challenges, and future goals.
-
Enable the "Enable meeting for performance review discussions" option and then click on +Add Meeting.
-
Provide a title, assign participants, and designate someone to write a summary after the meeting and click on Save.
Publishing the Review
-
In this step, decide who will write the review summary and who will publish the feedback. You can also make it mandatory for the employee to acknowledge the feedback.
Managing Timelines
-
Set deadlines for each stage of the review process, such as nominating reviewers, submitting forms, and publishing reviews. You can also exclude weekends from the timelines.
-
For more customisation, click on Change under the Form filling order section.
-
Within the 'Form filling order' window, select the Custom option to begin configuring individual timelines. In the Configure Sequence & Timelines section, you can add various reviewer stages, such as Self, Reporting Manager, or Department Head. Specify the number of days allocated for each reviewer by inputting the desired time frame next to each reviewer type.
-
Review your custom timeline settings and total days to ensure they align with your review cycle goals. Click Save to implement the custom timelines for your review process.
- By customising each stage of the review process, you can achieve a more structured, efficient, and effective evaluation cycle.
Managing Visibility
Control who can view the reviews by adjusting the Visibility Settings. You can make the reviews public, restrict them to certain individuals, or keep them private. This provides flexibility and ensures that sensitive information is only available to the right people.
-
Navigate to the Visibility Settings and select Set Custom Visibility to define the level of access for each reviewer.
Mapping Employees to Review Cycle
-
Now, assign the employees who will be part of this review cycle. You can also assign managers to oversee the cycle. As in Advanced Setup, you have the option to divide employees into different groups, each with their own set of managers and questions. You can add employees to these groups through Condition-Based Selection, Manual Selection, or by importing data from an Excel/CSV file.
- You can filter employees based on department, job title, location, business unit, pay grade, or legal entity.
-
Once all these steps are completed, you have the choice to either launch the review cycle immediately or save it to make changes later.
-
You can select all employees or choose specific ones from the list, then click Launch.
Managing Review Groups and Cycles
-
After creating the review cycle, you can modify settings for each group, such as changing questions or other configurations.
Notes & Tips
Note: Any modifications made to the questions or any other aspect of reviews will not automatically update for employees for whom the review has already been launched. To apply these changes, you will need to cancel and restart the reviews.
Setting up a review cycle with Keka's advanced setup gives you the flexibility and control for an effective performance review process.
And there you go! That's how you set up a review cycle using Advanced options. Remember, you can always save your settings and come back later if you need to make adjustments.
Comments
0 comments
Please sign in to leave a comment.