With Checkr integrated into Keka HRMS, managing background verification is now seamless and efficient. This guide will help you set up the integration, order background checks, and track their progress—all from within the Keka platform. Simplify your processes and experience hassle-free BGV management like never before!
Table of contents
- Getting started
- Connect to Checkr
- Create a Checkr account
- Account hierarchy
- Order background checks
- Review background checks
- Resubmit a background check
- Checkr’s candidate experience
- Use the Checkr Dashboard
Getting started
To enable the Checkr integration, first you’ll need:
- Admin access to Checkr.
- Admin access to Keka HRMS.
Connecting to Checkr
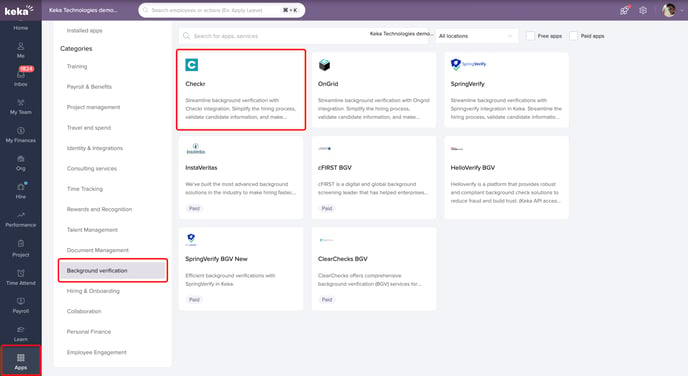
Log in to your Keka portal and navigate to Apps from the left navigation pane select Background verification section. Here, look for the Checkr tile and click on it to open the Checkr informational page.
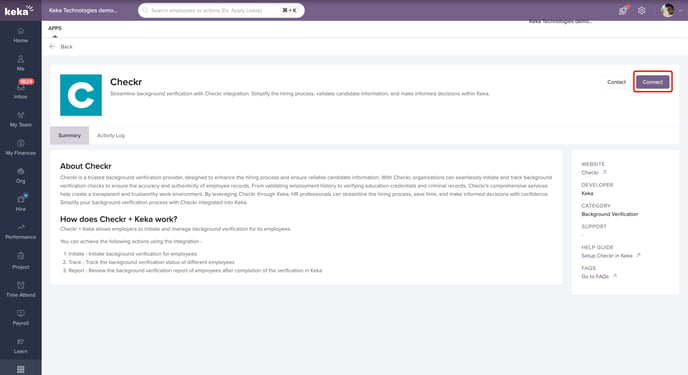
Click the Connect button and A sign-in/sign-up page will appear.

A Sign-up/Sign-in page will appear, allowing you to connect either a new Checkr account or an existing one. Complete the sign-up or sign-in process.
NEED TO ADD ONE MORE SC?? a good one

After completing the process, you will be redirected to the Checkr page within Keka, where the connection status will be displayed.
- For new accounts, the status will show as Connecting, pending authorization while Checkr credentials your account.
- For existing accounts, the status will show as Connected, confirming the successful integration.

Once connected, you can start running background checks via Keka.
Creating a Checkr account
If your company does not have a Checkr account, you can create one during the integration process with Keka. Follow the steps in the “Connect to Checkr” section to begin the setup.
During the sign-up process, you will be directed to a Checkr page where you can either sign in to an existing account or create a new one:
- Existing Checkr Customers: Select Sign In to connect your current Checkr account to Keka.
- New Checkr Customers: Fill in the required details, select Sign Up to create a new Checkr account, and provide your company information.

Next, provide your payment information, either credit card or bank details. Invoices for background checks will be issued directly by Checkr, not Keka. You can update your payment details later through the Checkr dashboard once the account is set up.

Click Finish Sign Up to submit your account to Checkr for review. Once the credentialing process is complete, Checkr will notify both you and Keka, enabling you to start syncing background check data through the Keka platform.

Once you have connected to Checkr, you will be redirected back to Keka.
Account hierarchy
The integration allows users to configure "nodes" within their Checkr account, which appear when ordering a background check. Nodes can be used to represent different locations, teams, or groups within your organization that request background checks. After creating nodes, you must assign packages to them. Checkr invoices will detail which node ordered which package.
When placing a background check order, you’ll select the appropriate node and choose from the packages assigned to it. The invoices will reflect background checks ordered by each node within two billing cycles after setup.
If you have configured Nodes in your Check account, Keka will display the nodes along with the packages linked to the nodes at the time of initiation of BGV for your selection.
To order a background check using account hierarchy and nodes, refer to the steps in the “Order Background Checks” section. During the process, Keka will prompt you to select the relevant node (if applicable) and package for the order.

The available packages are displayed based on the node you select. Choose the background check package you wish to order. If no packages are visible, ensure the appropriate packages are assigned to the selected node in your Checkr Dashboard before proceeding.
For more details on account hierarchy, nodes, and account configuration, refer to Checkr’s Help Articles on Payment & Billing, Adverse Actions, and Manage Account Settings.
Ordering Background Checks
You can initiate background checks during onboarding or as a one-off task.
Option 1: Initiating a Background Check During Onboarding
Navigate to Org > Onboarding > Preboarding.In the BGV stage column, click Not Started for the candidate.
To process background check in bulk, select candidates and choose Start BGV under BGV Actions.
Option 2: One-Off Task
Navigate to Org > Onboarding > Background Verification.Click Start New Verification and confirm the disclaimer.

Choose whether to “Select Pre-Onboarding Candidates” or “Select Employees.”
Once you've made your selection, choose the candidate and click “Save.”

You will see a page with the selected employee(s). Click “Next.” 
Choose Checkr as your vendor and select your preferred background check package. Click “Next.” 
Review and confirm your details. If everything is correct, click “Initiate BG Check.” 
Review background checks
Monitor a Background Check via the Verification Tab
Navigate to Org from the left menu and Select Onboarding from the top navigation bar.Click on Background Verification to view all active verifications and Find the candidate you want to monitor from the list.
Each candidate’s row will display their Status and available Actions:
- The Status indicates whether the background check is in progress, complete, or requires review.
- For additional details, click View Activity.
- To review the full report in Checkr, select View Report. This will redirect you to Checkr for a detailed background check review.


Resubmitting a Background Check
In case of failure, you can resubmit a background check by following the steps under Ordering Background Checks.
Checkr’s Candidate Experience
Checkr's candidate experience overview outlines the background check process from the candidate's perspective. It addresses common questions and helps resolve typical issues.
Using the Checkr Dashboard
While the integration enables users to order background checks and view their status, the following features are only accessible within Checkr:
- Ordering a candidate's report
- Adjudicating a candidate’s report
- The adverse action process: Deciding to not proceed with a candidate
- Candidate stories: Gaining insights into the candidate’s past and present
- Managing Checkr settings
- Managing account users
- Setting up payment information
This integration ensures a seamless and efficient background verification process, combining the strengths of Keka and Checkr to streamline your hiring workflows!
Other information
How to view BGV reports received through the Checkr integration?
Once you click on the "View Report" button under the Preboarding or Background Verification tab, you will be redirected to the Checkr portal, where you can view the report and take adverse action if required.
![]()
Add additional checks to your Checkr-initiated verifications.
Under the 3 dots in the Preboarding or Background Verification tab, you will be provided with another option to "Start new BGV"

What do I do in case of invitation expiry?
If a candidate fails to accept the invitation, you can simply click on "Resend Invitation" to restart the BGV process for the candidate.
![]()
Which Checkr statuses does Keka support?
Keka supports 30 Checkr BGV statuses to make sure you miss no updates.
Please let us know if you find this article helpful.


